How to Set Up Your Automation Tools (n8n) for Free on Your Computer
Learn how to set up n8n, a powerful automation tool, for free on your computer using Docker. This step-by-step guide walks you through installing Docker, configuring n8n, and creating workflows without complex server management or subscription costs.
Why Every Developer Should Have n8n in Their Toolkit
After spending years building integrations for clients, I’ve learned that automation is the secret weapon that separates efficient businesses from those drowning in manual tasks. While services like Zapier and Make (formerly Integromat) are excellent cloud options, nothing beats having your own automation server for cost-effectiveness and control.
In this guide, I’ll show you how to set up n8n – an open-source automation tool that rivals commercial alternatives – completely free on your local machine. Whether you’re looking to collect form submissions, automate data processing, or create complex workflows between disparate systems, this setup will give you a powerful foundation without monthly subscription fees.
What Makes n8n Special?
Before we dive into installation, let me quickly explain why n8n deserves a place in your toolkit:
- Open Source Foundation: Unlike Zapier or Make, n8n’s core is open-source, giving you transparency and flexibility
- Self-Hostable: Run it locally or on your own server without ongoing SaaS fees
- Fair-Code Licensed: Free for personal and many commercial uses
- Rich Node Library: Connects with 200+ services out of the box
- Visual Workflow Builder: Intuitive interface for creating complex automations
- Code Nodes: When pre-built nodes aren’t enough, write custom JavaScript
Let’s get started with the installation process. I’ll walk you through each step to ensure you have a smooth setup experience.
Step-by-Step Installation Guide
Step 1: Download Docker Desktop
Docker provides the container environment that makes n8n installation consistent and reliable across different operating systems. Start by visiting the official Docker website at https://www.docker.com/ and click on “Download Docker Desktop”.

Step 2: Install Docker for Your Operating System
Docker installation varies slightly between operating systems. Select the appropriate guide for your platform:
- Windows: Docker Installation Guide for Windows
- Mac: Docker Installation Guide for Mac
- Linux: Docker Installation Guide for Linux
Note for Windows Users: Make sure you have WSL2 (Windows Subsystem for Linux) installed, as newer versions of Docker Desktop require it. The Docker installer will guide you through this process.

Step 3: Launch Docker Desktop
After installation, open the Docker Desktop application. Your dashboard will appear empty if this is your first time using Docker. If you’ve used Docker before, you might see existing containers listed.
Step 4: Create a Data Storage Folder
This critical step ensures your automation workflows and settings aren’t lost when you restart n8n. Create a folder on your computer named n8n-data (or any name you prefer) that will persist your n8n configuration.
I typically place this in my Documents folder for easy access, but you can choose any location you’ll remember. This folder will store all your workflows, credentials, and configuration data.
Step 5: Sign In to Docker Desktop
For the smoothest experience, sign in to your Docker account. This step isn’t strictly necessary but provides benefits like increased download limits and better image management.

Step 6: Pull the n8n Image
Now let’s grab the n8n software package from Docker Hub:
- Navigate to the Images tab on the left side of your Docker Dashboard
- Press Ctrl + K (or Cmd + K on Mac) to open the search dialog
- Search for n8nio/n8n
- Select the official image (the one with over 100M downloads)
- Click Pull to download the image
Once downloaded, the n8n image will appear in your images list, ready to be launched.

Step 7: Run the n8n Image
After the image is downloaded, click the Run button next to the n8n image. If you have multiple images, make sure you’re selecting the correct one (n8nio/n8n).

Step 8: Configure Optional Settings
Before launching n8n, you’ll need to configure a few settings:
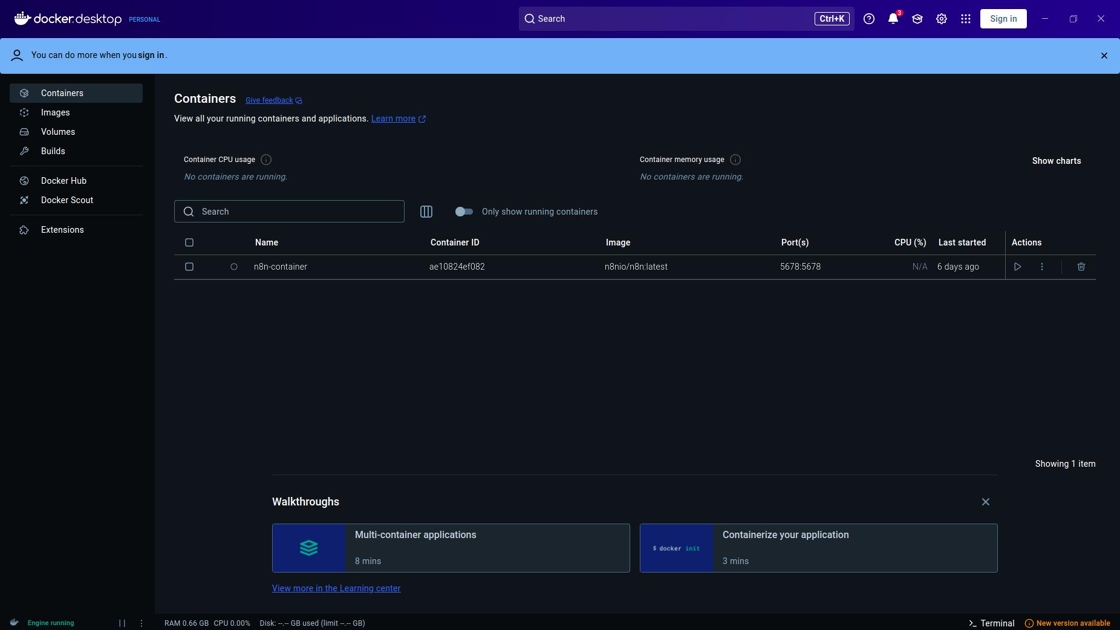
- Give your container a memorable name (e.g., n8n-instance or my-automation-server)
- Set the port to 5678 - this is the default port n8n uses and what you’ll access in your browser

Step 9: Map the Data Folder (CRITICAL STEP)
This step is absolutely crucial and often overlooked. Without it, all your work will be lost when you restart Docker:
- Scroll down to the “Volumes” section in the configuration panel
- Click “Add volume”
- For “Host path”, browse to and select the n8n-data folder you created earlier
- For “Container path”, enter exactly: /home/node/.n8n
This mapping ensures that all n8n data is saved to your computer’s permanent storage. Skip this step, and you’ll lose everything when you restart Docker!

Step 10: Access n8n
After running the container, you’ll see a message confirming that n8n is accessible at http://localhost:5678/. Open your preferred web browser and navigate to this address.
In my experience, Chrome and Firefox both work perfectly with n8n’s interface, though I slightly prefer Firefox for its developer tools when testing complex workflows.

Step 11: Set Up Your n8n Account
Since this is your first time using n8n, you’ll need to create your administrator account. This account will have full access to manage workflows, credentials, and settings.
I recommend using a strong, unique password here - n8n will eventually store API keys and other sensitive information for your integrations.

Step 12: Explore the n8n Interface
Once your account is set up, you’ll be directed to your workflow dashboard. Take some time to familiarize yourself with the interface:
- Left sidebar: Access workflows, credentials, executions, and settings
- Main canvas: Visual workflow builder where you’ll connect nodes
- Node panel: Browse available integrations and actions
If you’re coming from Make/Integromat or Zapier, you’ll notice n8n offers a similar visual approach but with more technical flexibility and control.

Step 13: Start Automating
Now comes the fun part - building your first automation! Click the ”+ Create Workflow” button to start fresh. Here are some simple first projects to try:
- Email digests: Schedule daily summaries from your favorite data sources
- File conversions: Automatically process uploaded files in different formats
- Social media publishing: Schedule and post content across platforms
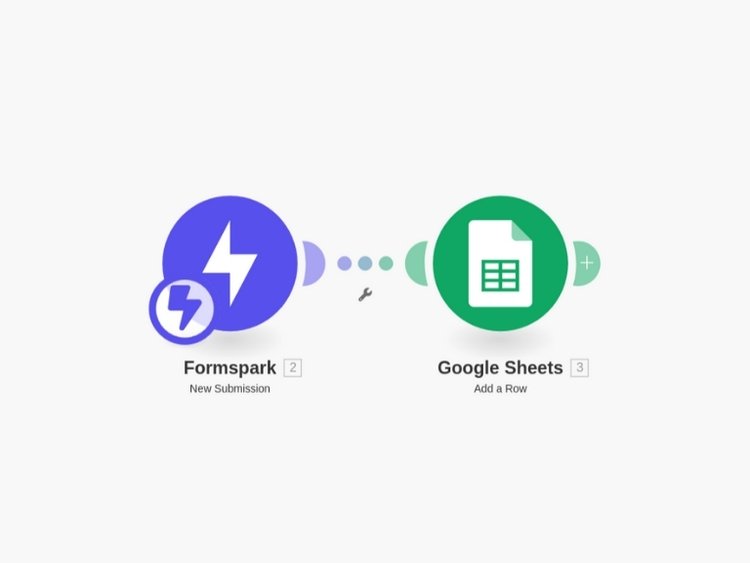
- Form processing: Save form submissions to spreadsheets (like we discussed in my other guide)
- Web scraping: Extract data from websites on a schedule
Each workflow starts with a trigger node (when should this run?) and continues with action nodes (what should happen?).

Step 14: Managing Your n8n Instance
When you’re done working with n8n, you have two options:
- Keep it running: Leave the container active if you have workflows that need to run on a schedule
- Stop the container: If you’re just experimenting or don’t need constant execution
To stop the container, return to Docker Desktop and click the Stop button. This will shut down n8n until you restart it.

When you want to use n8n again, simply go to the Containers tab in Docker Desktop and click the Start button for your n8n container.
Making the Most of Your Local n8n Instance
Now that you have n8n running, here are some advanced tips I’ve learned from using it for client projects:
Connect to External Services
The real power of n8n is connecting different services. To do this securely:
- Go to Settings → Credentials
- Create new credentials for each service (like Google, Slack, GitHub, etc.)
- Use these stored credentials in your workflow nodes
This approach lets you update API keys and access tokens in one place when they expire or change.
Create Workflow Templates
Once you’ve built a few useful workflows, consider creating templates:
- Build a workflow that handles a common task
- Export it as a JSON file (using the “Export” button)
- Save these templates in a GitHub repository for reuse
I maintain a collection of standard workflows for tasks like CSV processing, API polling, and notification systems that save hours of setup time on new projects.
Use Webhooks for External Triggers
While scheduled triggers are great, webhooks offer real-time processing:
- Add an “Webhook” trigger node to your workflow
- Configure it as “Receive data”
- Activate the workflow to generate a unique webhook URL
- Use this URL as a callback for external systems
This is perfect for triggering actions when forms are submitted, when orders are placed, or when other systems need to notify your automation.
Use Environment Variables for Flexibility
For data that might change between environments:
- Go to Settings → Variables
- Create variables for things like API endpoints, email addresses, etc.
- Reference these in your workflows using expressions like
{{$env.VARIABLE_NAME}}
This makes your workflows more portable and easier to modify.
Production Considerations
While this local setup is perfect for personal use and development, there are some considerations for production environments:
Continuous Operation
If you need workflows to run 24/7, consider:
- Cloud hosting: The n8n Cloud service offers fully managed instances starting at $20/month
- Self-hosting: Deploy n8n on a VPS using their Docker Compose setup
- Desktop persistence: Configure Docker Desktop to start automatically with your computer
Data Security
For workflows handling sensitive information:
- Use encryption for credential storage
- Implement proper authentication if exposing n8n to the internet
- Consider n8n Enterprise features for larger organizations with compliance requirements
Backup Strategy
Don’t lose your automation work:
- Regularly export important workflows as JSON files
- Back up your n8n-data folder to cloud storage
- Consider a Git-based workflow for version control of your automations
I personally maintain a private GitHub repository with all my workflow exports, organized by client and purpose. This has saved me countless hours when rebuilding environments.
Troubleshooting Common Issues
Having set up n8n dozens of times, here are solutions to the most common problems:
Container Won’t Start
If your n8n container fails to start:
- Check if another application is using port 5678
- Verify your Docker installation has enough resources allocated
- Look at the container logs in Docker Desktop for specific error messages
Can’t Access the Web Interface
If you can’t reach http://localhost:5678:
- Confirm the container is running in Docker Desktop
- Try accessing with a different browser
- Check if your firewall is blocking local connections
Workflows Not Running on Schedule
If scheduled triggers aren’t firing:
- Ensure the container remains running (Docker containers stop when your computer sleeps)
- Check timezone settings in n8n
- Verify that the workflow is activated (toggle in the upper right)
Conclusion: The Power of Self-Hosted Automation
Setting up n8n locally gives you a powerful automation platform that remains under your complete control. Unlike cloud-only solutions, you’re not limited by monthly operation counts or restricted to specific integrations.
I’ve used this exact setup to build everything from simple form processors to complex data pipelines that would cost hundreds of dollars monthly on commercial platforms. The initial investment in learning Docker and n8n pays dividends almost immediately.
Ready to take your automation skills even further? Check out my guide on creating professional flowcharts in minutes to document your workflows.